
Language: Deutsch · English
 Nuclet: Banking interface (ISO 20022) (not yet available)
Data sheet and documentation entry point for the Banking (ISO 20022) Nuclet (banking interface based on the ISO 20022 standard).
CONCEPT INTEGRATORS UPDATED: JUL 2026 APPLIES TO NUCLOS 4.2026.X
On this page
Machine-translated – under review
This page was machine-translated from German as a first draft and is currently under review. The authoritative source remains the German original (see the language switch above).
Table of contents
Releases
| Version | Date | Notes | Compatibility |
|---|---|---|---|
| 1.0 | 11.9.2018 | First published version | from Nuclos 4.26.1, 4.27.5, 4.28.3, 4.29.0 Database: Postgres |
Overview
The "ISO2002" Nuclet enables handling of files defined by the ISO-Standard 20022 .
| Feature scope (1.0) |
|---|
|
| Feature scope (planned for version 2.0) |
|---|
|
Integration of account statement import (CAMT)
| Step | Description |
|---|---|
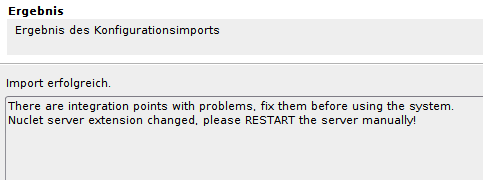
| 1 | Nuclet import (see Nuclet import) After importing the Nuclet, a restart of the server is required first.
|
| 2 | Configure integration point currency If not present, a new business object for currencies must be created. A required field is a text field in which the respective currency code according to ISO 4217 must be entered. Then Integrationspunkt configure currency by selecting the target Nuclet, the currency BO it contains and the field for the currency code (under the menu item Configuration). |
| 3 | Set default value for import format (optional) If the same file format is used regularly for the import (see next point), it is advisable to set your own default value for new imports. For this, in the Konfiguration für Businessobjekte for the field Message type in the business object CAMT-Import select a default value. |
Using the account statement import
Perform import:
- Select mode or file format and the file to be imported, and save
- Select the import button. Depending on the size of the file, this can take a few minutes.
The import creates business objects for all contained account statements, closing balances and transactions, which are then also available under the menu item CAMT/Archive .
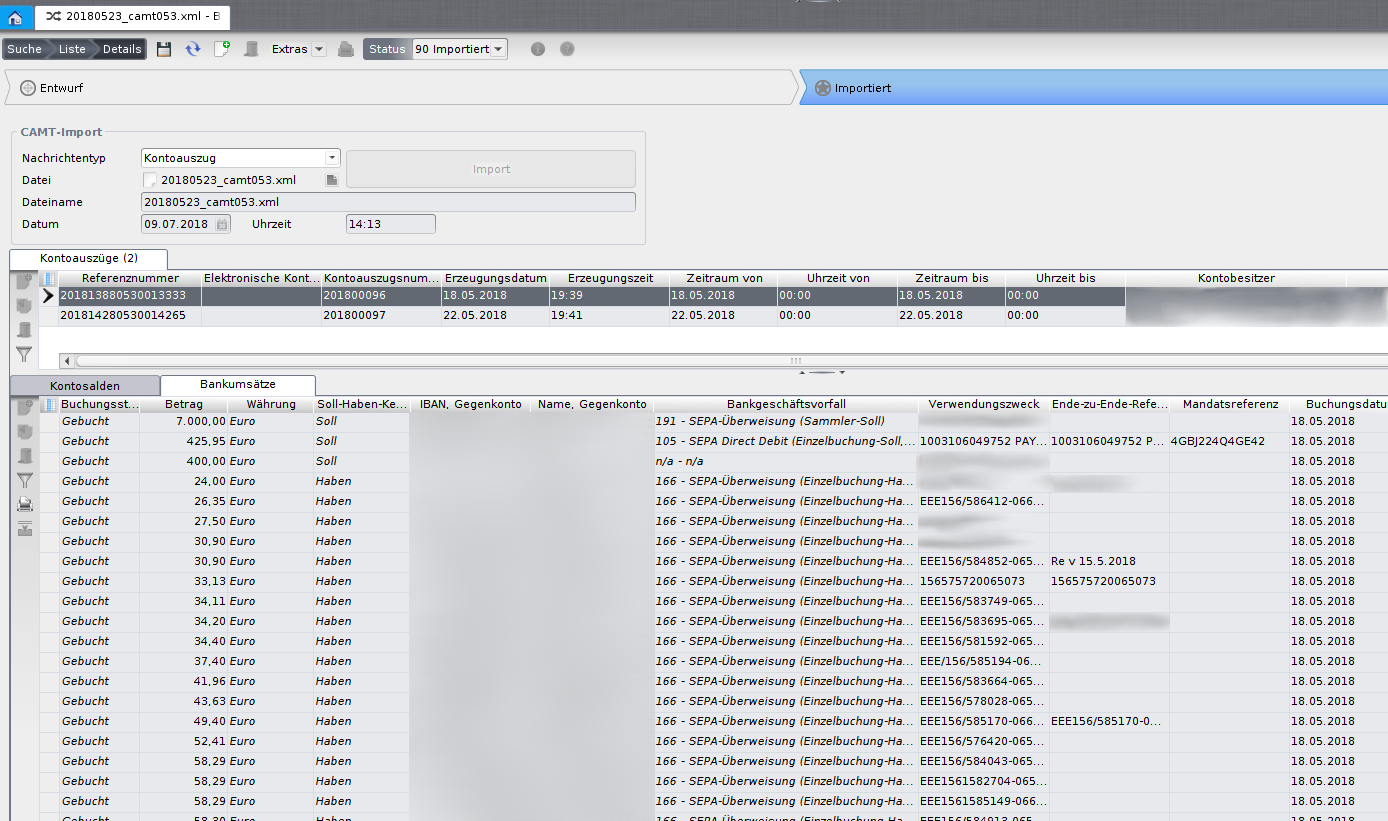
Account statements: Individual statements described in the import file.
Account balances: Closing balances of the selected account statement. The individual balance types are described under CAMT/ Master data .
Account balances: Individual transactions of the selected account statement.
Import jobs
The import of transactions in CAMT.053 and CAMT.054 formats can also be automated as a Job .
For this, the following parameters must be set in the Nucletmanagement :
CAMT File Encoding : encoding of the import file (usually UTF-8)
CAMT File Directory : directory in which the files to be imported are stored
CAMT File Extensions : restriction of the files to be processed by extension, comma-separated list (e.g. .xml, .txt)
Integration (payment reconciliation)
| Step | Description |
|---|---|
| 1 | Create status model for reconciliation object create Due to current restrictions when using integration points, the reference object for the payment reconciliation must have a status model even if the automatic status change is not used. It is sufficient to set the "State model" flag in the BO editor and a simple state model (one status and a transition from the start point) anzulegen to the reference object. |
| 2 | Configure integration point for reconciliation object In this step, the business object for the payment reconciliation is configured. The following fields must be assigned: Currency (reference field): the reconciliation object must have a reference to the existing or newly created BO currency (see above). Amount (decimal number): the amount to be settled. Open amount or Amount paid (decimal numbers): on successful assignment, the amount from a transaction is recorded here.
Payment date actual (date): is set when the amount is settled. Comparison fields (text): up to five text fields from the reconciliation object can be selected for defining the reconciliation rules (see step 3). Paid (yes/no field): indicates whether the amount of the reconciliation object has been settled by the last transaction. If yes, the object is no longer Caution: If reconciliation objects are not marked as paid/open by a status model, this field is necessary! Reference additional reconciliation object (reference field): additional BO referenced by the reconciliation object for use in reconciliation rules (e.g. invoice → customer), selection takes place in step 3. Amount inverted (yes/no field): if this field is set in the target object, the sign of the amount from the transaction is reversed during reconciliation. Useful for objects such as credit notes whose amount is positive but which are reconciled with debit transactions. |
| 3 | Configure integration point for additional reconciliation object (optional) Comparison fields (text): analogous to step 2, up to five text fields can be selected for defining the reconciliation rules (see step 3). |
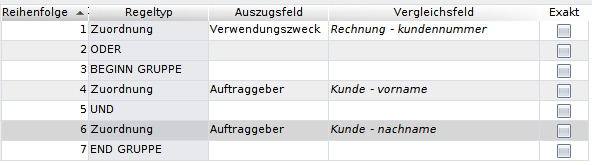
| 4 | Define rules for payment reconciliation Under the menu item CAMT/Payment reconciliation definition you can define rules for the assignment of transactions. Such a definition is used for carrying out a payment reconciliation, but you can also create multiple definitions and use them as needed. Name: A name for the definition. Credit/debit: Selection of whether credit, debit or all transactions of an account statement are to be compared. Assignment rulen : Rules that are used for the reconciliation. Each rule can have multiple entries in which a field from the account statement (statement field) is assigned to a comparison field configured in step 2 or 3. These entries can be linked with AND- or OR-operators. Each linking of two or more assignments forms a group, whereby only one of the operators can be used within each group. To use both operators in one rule, groups of AND and OR links must be enclosed with the entries BEGINN GRUPPE and END GRUPPE, which act as brackets. Example: assignment of an invoice by customer number or first and last name
If the selection Exakt is set, only an exact match is counted as a hit; otherwise, upper and lower case as well as spaces at the end and beginning are ignored and it is additionally checked whether one of the fields is contained in the other. Strings consisting of 3 or fewer characters are skipped in this last step. For each rule, it can be selected whether a hit leads to the immediate assignment of the transaction. This only happens if the hit for this rule is unique (and other rules with immediate assignment also find no other hits). The following fields from the account statement are currently available for the reconciliation:
Perform status change: Indicates whether a status change should be performed on successful assignment. If yes, the Target status must not be empty. Valid source status: Only reconciliation objects with a status specified here are included in the payment reconciliation. Target status: Target status for the automatic status change. Attention: in the Status model of the reconciliation object, an (automatic) status change to the target status must be enabled for each valid source status. Perform status change: Return status for using the function Reset assignment in the payment reconciliation (see further below). The corresponding status change must be enabled by the status model. Filter bank transactions: Here, bank transactions (transaction types) can be selected in order to exclude all transactions of the type from the payment reconciliation. Each transaction from an account statement is assigned such a type; the list of all types can be found under CAMT/Master data/Transaction type. |
Using the payment reconciliation
Create
- Selection in the menu item CAMT/Payment reconciliation.
- Bank statement or Select import process
- Select definition for the payment reconciliation
- Save
In the upper form, all transactions from the account statement (possibly filtered by transaction type and debit/credit) are now listed. Further details can be displayed via a right-click in the transaction column.
Start payment reconciliation
After clicking the button Start reconciliation Nuclos begins to assign the transactions according to the defined rules. Depending on the number of transactions and reconciliation objects, this can take a few minutes.
The result of the reconciliation is shown by a colouring of the transactions and the changes in the column Status . (Potential) hits for each transaction are displayed when selecting a transaction in the lower form (Assigned objects). The following possibilities exist:
- Transaction in status 10 (Not assigned): no matching reconciliation objects found
- Transaction marked yellow and in status 30 (Potential assignment): hits were found via a rule without the option assign immediately or multiple hits were found
- Transaction marked green and in status 50 (Assigned): a unique hit was found via a rule with the option assign immediately found. Values and, if applicable, the status of the reconciliation object have been updated.
- Transaction marked red and in status 90 (Reconciliation failed): : a unique hit was found via a rule with the option assign immediately found, but the update or the status change failed.
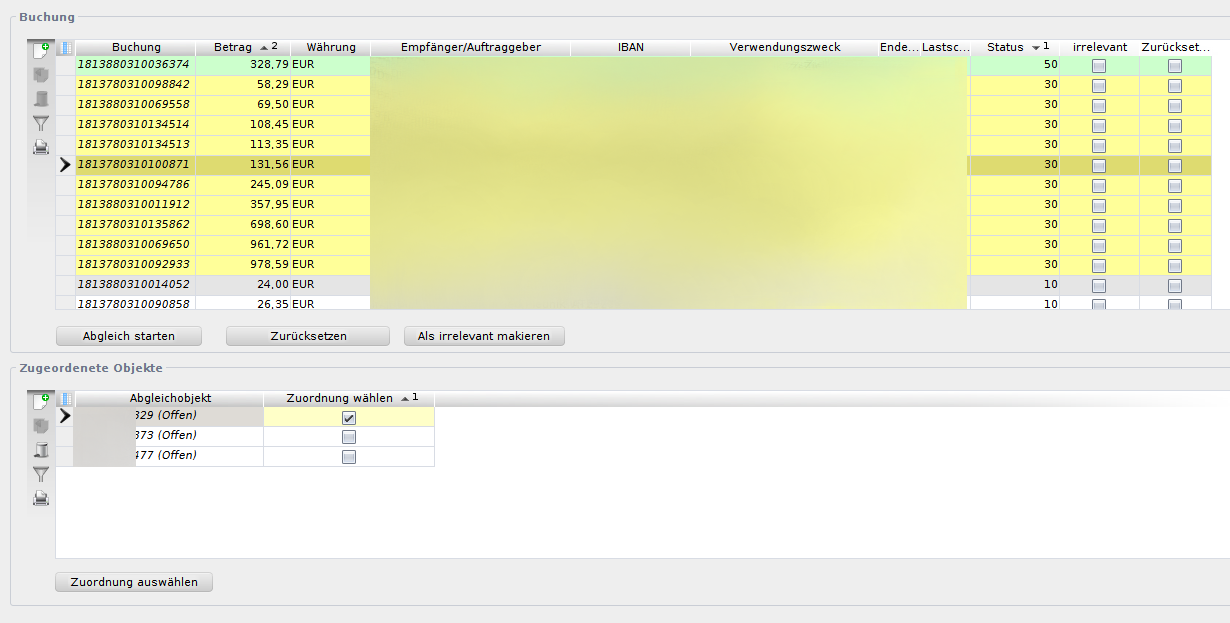
For transactions in status 30, it is now possible to make the correct selection among the potential assignments (details can be displayed via right-click on the reconciliation object) and to select the assignment manually. The following steps are necessary for this:
- Selection of the column Select assignment for the desired reconciliation object (for one or more transactions)
- Save
- Button Select assignment use
For transactions in status 90, a manual assignment can also be made after searching for errors in the reconciliation object. If corresponding error handling exists, the error message from the reconciliation object is also displayed if the manual assignment fails.
Other functions
Mark as irrelevant: In addition to the available filter options, it is possible to mark individual transactions as irrelevant in order to exclude them from the payment reconciliation. This can help to make the process clearer. Usage analogous to the manual assignment:
- Activation of the selection in the column irrelevant for the desired transactions
- Save
- Button Mark as irrelevant use
Reset assignment: In the case of incorrect hits or accidental incorrect assignment, you may want to undo an assignment.
- Activation of the selection in the column Reset for the desired transactions
- Save
- Button Reset use
ATTENTION: When using the reset function, all changes made by the payment reconciliation are undone. Changes to the reconciliation object made by user rules or other components during the update or the status change of the reconciliation object can NOT be undone. An assignment with a status change can only be undone if the corresponding status change is enabled by the status model.
Related pages
Überblick
Inhalte